Friday, December 23, 2011

Klejner (known as Fattigman among those of Norwegian extraction)


I am somewhat conflicted regarding my Scandinavian heritage. My mother was adopted into a Danish familyand was reared with proud Danish tradi
tions. After she died, I discovered her biological roots were Norwegian. This fact, combined with my brother-in-law having Norwegian roots and being an excellent cook/baker, has brought me to thinking Norwegian over Danish in my later years. But still, all my early Christmas traditions center around Danish memories. And the one tradition that I insist is better in Danish form than Norwegian is that of the Danish donuts known as Klejner (pronounced klein-er) over Fattigman (futty-mun?)


This is the sort of recipe that demands participation. In other words, don't try this alone. Better yet, have someone present that has done it before or at least witnessed the process. Be prepared to have a lot of cookies when you're done even though the dough might look small. I have erred by doubling the batch and believe me, it was a long night frying dough.

One last attempt to dissuade anyone from making these: the clean-up is horrendous. The more frying pans you have, the faster it will go but the more to clean. Without further ado, here is one last recipe handed down by my mother from her (Danish) mother:

Klejner (Danish Donuts but really fried cookies)

3 eggs
1 cup sugar
1/2 tsp salt

4 tbsp cream
1/2 cup MELTED butter
1 tsp baking powder
3-4 cups flour
1 tsp vanilla or cardamon (I've only ever had them with cardamon)

Beat eggs and sugar together, add cream, melted butter, and then dry ingredients.

Add enough flour to make a still dough. Chill for easier handling. (Impossible to handle if not chilled.)

Take about an orange-sized gob of dough (err on the less rather than more) and place on a floured surface. Roll flat. With a pastry wheel (or pizza cutter), cut diagonal lines resulting in diamond shapes (or pointed rectangles as my original recipe says.) Make a small slit down the center of each shape.

The picture to the right is pretty accurate except for the extra margin of dough cut out between the individual cookies. I've never done that.

Shape the klejner -- easier to show than describe. My mother's recipe simply says "turn through the middle." It really is easy, but work gently. Pull the center open slightly, then bend the top point back
and pull it through the middle toward you. I hope the picture helps explain this.

My recipe also lacks detailed frying instructions other than to say it takes about a pound and a half of shortening, although a larger fry pan might need 2 pounds. The melted shortening should be deep though and test by dropping a very small amount of dough. If it sizzles and starts browning, that should be right for cooking the batch.

Fry about six at a time, too many will cool the oil and ruin the batch. When light golden on the oil side, flip over and brown the other side. Meanwhile, your cooking companion(s) can be busy rolling out another batch. Drain on toweling after removing from the oil.

Continue working batches until most of the dough is gone. We always save scraps and reroll for more, but you can also cut into other shapes.

Luckily for today's cooks, there is the Internet. You can find You-Tube videos demonstrating the entire process which I recommend for complete novices. After looking at several online recipes, I see slight differences in amounts and ingredients. My family recipe results in a donut-like texture although crunchy rather than soft. The results are more raised than some of the flatter ones I've encountered.

Should I ever have enough ambition to tackle these again, I might try a bit of lemon zest to punch up the flavor. They can tend toward the bland side so using fresh grated cardamon instead of powdered might give them more zip too.

Store them in tins lined with wax paper or paper towels. They actually last a long time but you could try freezing (probably come out soggy when thawed).

This is my last entry about my Christmas cooking traditions. Thank you for reading and may you enjoy the holiday season whatever way you celebrate.


Thursday, December 22, 2011

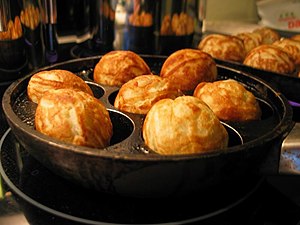
Aebleskiver - Danish Pancake Balls


The food that evokes the most childhood memories of Christmas and New Years would have to be Aebleskiver, which are literally pancake balls made in a special pan. My Grandmother made them every Christmas, usually as a late night treat after we'd all consumed a full dinner and dessert. Later, my mother would make them at random times throughout the year, but especially at Christmas.

My Grandmother was of German descendant but was raised in Denmark. She worked as a professional cook in private homes before coming to American to marry my Grandfather. (I have a wooden spoon of hers that my mother held onto, it is worn down to a nub on the end. I still use it.) She taught my mother and both were excellent cooks, although baking skills eluded her. My happy memories of her cooking are the aebleskiver and her crepes, which we always called Danish pancakes. My worst memories are of her cookies which were just strange at best, but generally hard and dry.

My recipe is the traditional one handed down by my Grandmother through my mother. It has yeast which makes it a bit of a pain, since that means a two hour rise time (possibly less with fast-acting yeast). There are decent buttermilk recipes out there and I daresay if you've never had the yeast version, they are plenty good. And I have to admit that my Norwegian-American brother-in-law did serve a buttermilk version a few years ago that was every bit as good. But this is Christmas week so here is the real deal.

Aebleskiver

4 Eggs
2 Cups flour
2 Cups rich milk (I take that to mean whole milk which is what I use)
1 Tbsp Sugar
1 Yeast Cake (I use one packet)
1/2 tsp salt
1/4 tsp cardamon

Dissolve yeast in sugar and salt. (Yes, it dissolves in dry ingredients)

Heat milk to lukewarm (should not burn your wrist but be very warm, as if you were warming formula for a baby)

Blend milk and flour, then add the yeast/sugar mix.

Beat in eggs one at a time (my mom would say if you use an electric mixer, you can add eggs all at once, these instructions are for hand mixing.)

Cover bowl and let rise for two hours (batter will rise to double)

Bake in aebleskiver pan:

An aebleskiver pan is round and has a ring of indentations around it. There is no substitute so do not make this recipe unless you have one or can borrow one. A good pan can be cast aluminum; the old style are cast iron (and apparently becoming valuable).

Spray the pan with non-stick spray before heating. This is obviously a modern touch but the other option is to rub it with oil. In fact, if you have a new cast iron pan, you'd probably better season it first.

Set the pan over medium high heat. In a separate small pan, melt down a good size chunk of shortening. Do not use vegetable oil here and do not use butter. If you really object to shortening, maybe veg oil would be okay but butter burns too fast.

With either a small ladle or a tablespoon, pour a tad of melted shortening into each indentation in the pan. The idea here is that you are deep frying individual balls. Follow with enough batter to almost fill each hole.

When the aebleskiver batter begins to bubble, check to see if one of them is nicely browning. Just use a fork to lift gently and look. If it is not liftable, it has a way to go. You might have to adjust your heat if they seem to brown too fast on the outside but staying raw on the inside. Usually the first batch is the test batch as you adjust heat and oil amounts.

When nicely brown and the batter is looking cooked (think of a pancake being ready to flip, the batter is at least skinned over) flip the balls over in the indentations. A long handled fork is best for this, but I have heard that traditionists use knitting needles. Frankly, that has never worked out for me or my mother -- we seem to be fork people. Any tool that works is good enough.

It only takes about half a minute once they are flipped. Remove them from the pan carefully and place on towels to drain.

This is important: You must pour in fresh melted shortening for each batch you cook. So spoon out another round of oil and then add batter again. While this batch cooks, you can sprinkle powdered sugar on the cooked batch, or you can just wait until they are all finished.

We always put them in baskets (like bread rolls) and passed them around, already sprinkled with powdered sugar. My mother insisted they be eaten with currant jelly or jam which is fine by me, but my kids hate. We've found that lingonberries are quite delicious as a substitute, but any jam or jelly is quite good. My husband loves to put butter on them but they certainly don't need it.

Something I have never done but would like to try is putting the jelly in them while they are cooking, right before turning them. I've also heard putting a small chunk of chocolate in them while cooking is fabulous and I believe it would be.


Tuesday, December 20, 2011

Italian Wine Cake


This is not a traditional recipe from my family. I have no idea if it really "Italian" since Italy is a very divided place and overall, not really a cakey country, if you get my drift. Although there is a traditional Sicilian cassatta that I would love to adapt. But I digress.

I found this in a magazine (Better Homes and Gardens?) in the seventies. The ingredients were so unusual that I just had to try it, figuring it would be fabulous or horrible. It was fabulous. The picture above is a wedge, while my recipe called for loaf pans. You could easily adapt to any pan, including a Bundt, just do not overbake.

Italian Wine Cake

(Hint: you need a BIG bowl for this, although I can manage it in my Kitchen Aid bowl, but barely)

2 Cups Raisins

Place in a pan and cover with water. Bring to a boil and turn off heat. Set aside.

Cream together:

1 cup shortening
1 cup butter
2 cups sugar

Add to mixture one at a time:

3 eggs

Sift together:

4 cups flour (sift before measuring0
4 tsp cocoa
4 tsp baking soda
2 tsp cinnamon
1 tsp nutmeg
1 tsp allspice

Add sifted ingredients to the batter alternating with 2 1/2 cups of Burgundy (or red wine of your choice -- Charles Shaw would be a decent option)

Fold in the raisins last. Divide the batter among 3 9x5 greased loaf pans.

Bake at 350 for 50 minutes (worth repeating, do not overbake, it dries out)

Let cool for at least 10 minutes before turning out onto a rack.

I've never frosted it but I'm sure a glaze of some sort would be quite good.

Monday, December 19, 2011

Christmas Week: Orange Pudding Salad

Why this is called a salad is beyond me. Orange pudding, yes. Salad--hardly. But this has knocked around in my family since I was a kid, recipe provided by Aunt Florence.

Aunt Florence was a longtime family friend who passed away a few years after my mom did, back in the eighties. Their relationship was complicated and not without rivalry, so for my mother to actually write down one of Florence's recipes usually meant that it was exceptional. Anyway, this time of year, I am nostalgic and besides, my brother-in-law absolutely loves this stuff.

Orange Pudding Salad Ingredients

2 3-oz pks Orange Jello
2 cups boiling water
1 pint heavy cream, stiffly beaten (I suppose you could substitute Cool Whip but really, why would you?)
2 small cans mandarin oranges
1 pint orange sherbet (yes, sherbet, not sorbet.)

Dissolve the jello in the boiling water. Let the mixture sit until nearly set - referred to in the original recipe as "snotty texture". You'll know why when you see it. Try not to let it set all the way because it doesn't come out as well. This stage takes some patience, it doesn't come quickly and then all of a sudden, it's too late.

Beat the snotty mixture until foamy, about 5 minutes depending on your mixer. Add the sherbet and beat together until blended.

Fold in the whipped cream and oranges, then thoroughly but gently mix.

Chill at least 4 hours before serving. Makes a boatload that serves twelve.

I've never tried molding this but it's probably too soft to work well. Additional gelatin might stiffen it enough for something like that.

I'm planning on posting more nostalgic favorites this week, but this is probably the only recipe I'll actually make this year.


Friday, December 9, 2011

The Festus Fizz

A number of years ago (probably about thirty to be honest) my husband worked on a television commercial with Ken Curtis, the actor who used to play Festus on GUNSMOKE. He turned out to be a really nice, outgoing guy and for some reason, he passed this drink recipe along that he created himself.

Without further ado:

Empty a can of lemonade into a blender (undiluted)
Fill blender with ice (about 2/3 full works well)
Fill lemonade can with milk and add to blender
Fill lemonade with your choice of gin, vodka, or rum
Add a few drops of orange flower water and blend until slushy.

The orange flower water adds a really lovely flavor but if you've never had it before, you probably wouldn't miss it. This is really a nice summer drink but I figured I'd forget about if I waited.

We used to make pitchers of these and serve to company when we'd grill in our backyard, back in our old house in south Minneapolis. The house we've lived in since the late 80s doesn't lend itself to backyard grilling, so we got out of the habit of making these.

Next up, I'm going to attempt mulled wine again this year and keep track of how I do it - assuming it comes out as well as my version last year. I wish I'd written it up then because I took several recipes and did a kind of mash up and it turned out really well.

Friday, December 2, 2011

A Few Words About QUORN

We are not a vegetarian household but we do eat meatless quite a bit. There is a high gross factor in meat, especially after reading extensively on the subject of factory farming. My "go-to" for many evenings is to make a simple hotdish using Quorn crumbles, a ground beef substitute. I also use their fake chicken tenders quite a bit, in stir fries or BBQ chicken pizza. (I use wholewheat Boboli for pizza crust a lot!)

This is not a paid endorsement. I just happen to love Quorn products as a meat substitute that actually tastes decent. Now if you are brand new to eating meat-alternative products -- and you are hoping that food will taste just like meat -- you might not be so wowed by Quorn. It took me years to accept eating meat substitutes because I viewed it as cardboard. And if you are expecting the taste of cooked hamburger and all you get are flavorless lumps, it is pretty disappointing.

My sons tell me that Quorn used to make a hot dog product that was superior in every way. Sadly, they appear to not make them anymore but I hope they bring them back. They make a "naked" cutlet that you can dip in bread crumbs and fry in olive oil that makes a wonderful chicken-less cutlet too. On Thanksgiving, I always cook the little Quorn roast so my Vegetarian son will have something too. The uniform roundness of it is a little off-putting but it "tastes just like chicken".

So what are Quorn products made from? According to their website, the main ingredient is produced from some type of fungi containing mycoprotein. So this is a vegan alternative (although I am saying that without checking the secondary ingredients). Interestingly, the website also says Quorn products "tend to be less in calories and saturated fat" which is a rather vague statement. As always, read labels for calories and fat.

A caveat about using meatless crumbles in recipes. I always prepare them by heating good oil (usually evoo) in a skillet first. Using a quality oil is important because you will taste the oil to some extent. Then I saute either garlic, onions, or both in the oil until soft. Last of all, I add in the crumbles which immediately absorb all the oil. There is never a lot to taste in meatless crumbles so onions or garlic are a must, imo. And that's it. I find a 12 oz pkg works as a substitute for 1 pound uncooked ground beef. You can make sloppy joes or tacos or put it in a baking dish with whatever hot dish ingredients.

I should add that Quorn products are not cheap. In fact, they are pretty damn pricey. Perhaps if they become more popular, the price will come down!


Wednesday, November 23, 2011

Yarn and Me: A Love Story

I'm in a flurry of knitting for Christmas. I can't even say who is getting what since there is always an outside chance they might stumble across this blog. But suffice it to say that it has given me an excuse to indulge in buying a whole new slew of yarn. Because guess what, nothing in my stash worked for anything I wanted to make!

My mother taught me to knit when I was about eight or so, I'm not sure exactly how old I was. I just recall how hard it was to struggle with the needles and yarn and how awful the results looked. Worst of all, it was incredibly tedious. Fast forward to my senior year in high school, when my mother tried again. This time, she gave me an easy project (a scarf) done with large needles. It had yarn overs an resulted in a wide lacy effect that looked complicated but was simple. For a short time, I was hooked and made about five scarves before getting bored again.

After that, about every five years or so, I'd buy some yarn and knit a scarf or something. I pressed my mother into teaching me how purl and other basic skills. I even got her to teach me to crochet just a year or so before she died. But every time I picked up the yarn and needles again, I'd get quickly frustrated which resulted in my dropping it.

What changed for me? About three years ago, I sold my remaining balls of yarn at our garage sale, convinced that I would never pick up knitting again. Then a year later, a young friend of mine had a baby. I was suddenly filled with the urge to create something to give to the baby, something more meaningful than a plastic rattle or store-bought blanket. Since knitted baby items are small, and therefore easier, I decided to purchase some baby yarn and a pattern book. Then I couldn't resist picking up some cotton yarn so I could make some wash cloths too.

Two years later and another baby was born, but I still have not completed a piece of baby clothing, not even a blanket. However, I have produced countless (really, I can't count them all) wash cloths in various sizes, patterns, and shapes. A few of them are even functional. But I have learned to knit and actually enjoy the process. For too long, I was anxious to produce a finished product, preferably perfect. The process of knitting was simply something to suffer through until I was finished and hopefully rewarded with something amazing. Yet nothing amazing ever resulted and often I just wound up tearing things back.

It's too bad it has taken me this many years to get past the frustration and disappointment that stymied me in the past. But this time, I was able to view all my disasters as practicing my skills. And thanks to technology, I was able to access immediate help for my knitting problems by looking at You Tube videos. I'm sorry but no matter how well written or how clear the illustrations, no book can compare to watching someone else do it. The help was immediate when I needed it too.

So I gradually became a more patient knitter and even acquired the skills needed to repair mistakes, rather than always frog (rippit) it back. Then I grew to actually love knitting (most of the time) after reading a magazine article wherein the author said something along the lines that knitters constantly told him they wanted to finish quickly. His response was that you should enjoy knitting, touching the yarn, looking at the colors, it should be a sensual experience. Otherwise, why would you continue knitting if you found it to be drudgery? Exactly what I had always run into, knitting became a drudge for me.

I invested in some very nice knitting needles, not top of the line but far nicer than the cheap plastic or metal needles from local craft chains. Then I started paying better attention to yarn. By this time, I had found Ravelry.com and if you are knitter or crocheter, you really need to go to that website. Hands down, the best designed website of any on the internet.

Now I live with a closet full of yarn and have learned the sad fact of stash-building. Any yarn bought because it was a good bargain and irresistible will never work out for any project. Never. Any time I settle on a specific project to make, I will find myself searching websites and stores and wind up buying a whole new bag filled with yarn.

Luckily, in the Twin Cities, we are blessed by having a wonderful Textile Center for the Arts, which also includes the Minnesota's Knitter's Guild. In the spring, they host a garage sale where members can donate yarn--and then return later to buy yarn at greatly reduced prices. I bought bags of yarn last year and yes, I'll probably donate most of it back and more besides. Perhaps this year I will be a little bit wiser in my buying habits when I see all my donated yarn on the tables.

The moral of this story is this. If you want to get started on knitting or crochet (and I plan to write a post about how they compare in my experiences) be sure to purchase good tools. That is, needles that feel good to you and probably won't be found in a chain store. While practicing on cheap yarn is a good idea, be sure that it has enough quality so that you won't be frustrated by it. Crummy yarn splits and can be rough on your fingers, taking all pleasure from the experience. Start checking out websites, especially Ravelry, for lots of ideas on simple patterns made with reasonable materials.

As for my holiday projects, I have one finished, one half done, and two more to go. I'll post pictures when I can.


Tuesday, November 15, 2011

Cooking Doldrums

I admit that I have a short attention span, although I can focus when inspired or fascinated. So I go in and out of cooking, but never have been able to sustain cooking meals at home for longer than a week, and that is a rare event.

What makes this a huge problem is that I want to...need to eat healthy. I want my family to eat healthy too, particularly my husband who is dealing with Parkinson's. Okay, we're all dealing with the Parkinson's but that's another post another day. We learned this past weekend that the usual healthy regime of lots of antioxidants and omega 3s is recommended for Parkinson's patients.

This isn't news. My husband had a stint implanted and has dealt with cholesterol and blood pressure for years. And yet neither of us remain focused on healthful eating for any length of time. I have many, many reasons to want to change my diet habits without falling into bad habits.

I've concluded that I need something different that a healthy recipe book. I've got tons of those to draw on, including various Eat Well type of magazines. What I need to find are ridiculously easy ways to eat when I don't feel like cooking or preparing. The right sort of things to have on hand that satisfy a snack craving or sweet tooth. As I start finding some answers, I'll be happy to share them here. And I'd love to hear how the rest of you stay healthy!

Wednesday, November 9, 2011

Pot Roast Results

Overall, the roast turned out quite well, although not so good that I would rave about it. However, my son liked it and ate an entire serving. If you knew Jake, you'd know that is a rave on his part.

What I didn't care for was my own fault and that of our slow cooker. I wound up overcooking it when I panicked over the progress on low setting. I kept fiddling with the temperature so it was a bit tough, although not at the inedible stage. Also, had I not been lazy, I could have removed the gravy that had formed during cooking and defatted it, then made it into a real gravy that would have been better.

So a satisfying meal if not a great one. Oh, and a bay leaf or two would have been nice.

Tuesday, November 8, 2011

First Post In Which I Make Pot Roast

Nothing sounds more housewifey than a pot roast, but don't let that scare you away. This is an experiment, which is pretty much how I cook nowadays. I used to follow recipes carefully and if I didn't have each and every ingredient, either the dish was abandoned or I made a trip to the store.

Today's pot roast began with a trip to Whole Foods, where they had chuck roast on sale. Since their meat is grass-fed and purports to be humane (the cows will love you for eating them!) I purchased a goodly chunk which turned out to be about 4 pounds. I wisely purchased onions, carrots, and potatoes since I know that is what I always want with my pot roast.

I also knew that I had on hand some horseradish cream and bay leaves. This morning, I perused the Internet for slow cooker pot roast and of course, was rewarded with an overwhelming number of recipes, most of them calling for either canned soup or dry soup mixes of various flavors, usually involving dry onions.

After reading through a number of recipes, I finally settled on the following procedure:

Heated oil on my gas range in the slow cooker pot. Brushed flour, salt and pepper on the meat and browned on both sides. Took meat out and slathered horseradish cream all over both sides. Placed sliced onions on the bottom of the pot (now off the burner.)

Put the meat back in the pot on top of the onions. Surprise ingredient: found a packet of swedish meatball sauce dry mix, so emptied it that into the pot. Added some low-sodium beef broth, enough to cover onions and come up to the bottom of the roast.

Put the roast on high, to bring it to a boil, then turned it down to medium. I might turn it to low later in the day, I'm expecting to serve this around six.

Last but not least, I peeled six large carrots, cut them in half and added them. Then put in ten small potatoes, unpeeled.

I have attempted pot roast in the past, several times, in my slow cooker and it has always come out bland. Tomorrow I will report the results.